Posts

Showing posts from 2022

Miracle L- Round 1

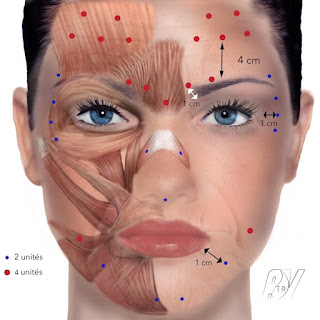
 Miracle L is an injectable solution that contains 20 % of hero ingredient PCL or  Polycaprolactone. This biostimulator is a similar product that makes dissolvable sutures. It becomes an irritant to the body which in turn creates collagen to break down the PCL. This process continues for up to a year, in turn providing tightness to the skin. It is also known as a face lift in a bottle. Miracle L is best to be used once a month for up to 5 months, which is my plan then used as a maintenance to the skin every 6-12 months. Although this product has huge benefits to the skin there is also the risk of swelling, and this being my first time I thought it best for me to use the mesotherapy method so I was injecting small amounts in each injection point. Miracle L is a thicker consistency than the more fluid solutions I have been used to injecting. For this reason I opted to use a 27 gauge needle. Unfortunately I could only find these needles in a 13 mm size. I would prefer up to a 6 mm but was

Mesotherapy Using Hyaron

 After starting with the BAP technique when injecting Hyaron (more info here ) I decided I'd give mesotherapy a try. Meso consists of injection points around 1 cm apart. That's a lot of pricking with a needle yet is a popular technique used in the DIY beauty world. I used a 30gx4mm tip on the prefilled syringe. After reviewing the video, I did notice that I injected closer than the 1cm which in itself is not an issue but it's unneccessary. If I'm honest, I much prefer the BAP technique. Much quicker and still effective because the product spreads. However, some biostimulators have a high likelihood of causing reactions such as swelling, so are better injected in smaller amounts all over rather than more product in fewer points. With practice I'm sure it would get easier. Even with my first try I began to get into a rhythm that made the process a little easier. To be fair, I am still so new to DIY that it's going to take time to perfect techniques that work for m

BB Glow

Image
 I recently had an event to go to. Oh yes, it's a rare event as my social calander is generally empty. I am definitely a home-body! Instead of applying foundation I took the opportunity to try the Stayve BB Glow. This product is cosmetically microneedled into the skin. Cosmetic microneedling just means that you are needling at no more than a 0.5 mm depth. I did it at 0.25 which is mostly painless and was a breeze to do compared to my regular medical microneedling at 1 mm depth. I emptied the small vial into a bowl and mixed some hyaluronic acid in for extra slip. Using a silicone spatula I applied the mixture to small areas of my face, microneedling in between. I made sure not to track over the same area too much to avoid redness. The procedure was easy, but took time. Waaay longer than just applying a tinted moisturiser, which is the finish that I got. There was no coverage, just a tint. However, the BB Glow does have ingredients that are beneficial to the skin, so it was like doi

Touch Up Using Toxta

 Having never had Botox in office before I was surprised that sometimes a touch up of botulinum toxin needs to be done 2 weeks after the procedure. I knew this was certainly going to be the case for me because I was very light-handed in the amounts of Toxta I initially had injected. If you haven't seen it, you can check out that post here . When I retrieved the syringes that I had filled with pre-mixed Toxta that I had placed in the freezer, I came upon a problem. One of the syringes had no product. I assume something had happened to it during our move. I didn't want to open a fresh vial of product so opted to just work with the few units I had in the remaining syringe. At the end of the day, I'm still trying to learn what injection points best work for me so at this stage I think using less amounts is the better option anyway, it's good practice. I am content with the area between my brows, typically where the 11 lines are. There's movement which is good because I

CelestaPro Unboxing

Image
Like all online shopping addicts, I get a nice dose of dopamine when a parcel arrives, today was no exception when I received some exciting goodies from South Korean online store Celestapro. Products on offer range from skincare to haircare to injectable products. Shipping is US$50. Sounds steep, especially when converting to our struggling Aus dollar. However, for me it's worth it because the cost of in office procedures far outweighs DIY and these products are MFDS approved (Korean version of FDA) so are safe to use. Anyway, back to my parcel of goodies.... The products I ordered were as follows Dermagen Trimo90 Shampoo Dermagen Trimo90 Tonic Save Our Skin Pack  which includes 3 Dermagen Masks, Miracle BR and a Bio Needle Bentpla Gel (for bruises) Miracle L Dermagen White Sun Cream Curenex Rejuvenating Solution Stay tuned for future reviews and procedures. I really need to create a schedule, especially for the injectable products because some procedures need both a regime and ti

First Time Trying Toxta

Image
 One of the 1st products I bought from South Korean website, AceCosm was Toxta. This is a botulinum toxin and seems to be a favourite among beauty DIYers for its effectiveness. I shelved the product (in the fridge) intimidated by the thought of injecting into my own skin. After reading articles and watching many videos, I decided to just be brave and do it. Well, believe you me, I was wracked with nerves at the thought of messing up. It's not dangerous per se, but a dropped brow or lid ptosis for up to 3 months is not ideal. As a novice I was not ready to inject in the bottom half of my face so mapped out my forehead, brow and eye area making sure to mark my "no-fly zone". It's important not to inject the area in the lid space above the iris of the eye to at least 1 cm above the brow. I look like a crazy person, but you can see this area marked in my video. If injected in this area, there's a high chance of dropping the brow. To be expected it's a good idea to

Round 2 Hyaron and Threads in Chin and Brows

I apologise for my lack of posts, I had to halt my DIY beauty journey because not only had I underestimated the mammoth task of moving after being in one location for 20 years, but this occured during the biggest flood in my home town since the 1800s. Thankfully, things are now getting back to normal, including getting Nbn internet after 3 l o n g weeks, lol.  I figured it was now time to pick up a syringe again and try and improve my skin. As a beauty DIYer I have to expect that not everything will go as planned and my DIY day did not go as smoothly as my other procedures to date. Beginning with injecting Hyaron. I obviously am no expert but the needle tip just did not feel right. I persevered with a few injections but then changed the tip which felt sharper and better to inject. However, this did get me a little flustered and I wondered why I had product left at the end when I had added 2 more injection points. I assume that when I was having trouble with the needle I wasn't inje

Hyaron and PDO Threads

Image
 After such an easy experience with injecting Hyaron in my face I figured I should treat my neck, too. Because using the BAP tecnique as explained in this post is a fairly quick procedure I put threads on my DIY agenda, too. A total of ten injection points are required for the neck, mapped out in the pic below. Once again, to make it easier for myself I marked the points with a brow pencil. What I didn't mention in the last post is that the injection points do not need to be exact, approximate is fine. The only tricky thing about doing my neck was difficulty seeing some of the marks, other than that BAP-ing my neck was easy and I felt less nervous than my first time injecting myself. Not going to lie, I haven't really noticed any difference, but it's a cheaper product to inject and I figure it's good practice before I try other injectables that can be difficult to use for some. It's so hard to decide where to place threads. I have so many areas I want to treat but

First Round Of Hyaron

Image
 After inserting threads I figured the next procedure to DIY would be injectables. This lead me to Hyaron which is an ideal product for beginners because it is a thin consistency with very low risk of causing a reaction. Hyaron typically comes in a large box with 10 x 2.5 ml syringes. They do not come complete with needles, so I bought some 30g x 4mm needle tips that just screw onto the end of the syringe. This product contains sodium hyaluranate (sodium salt of hyaluronic acid) sodium chloride, monobasic sodium phosphate and injectable water creating a highly purified hyaluronic acid which provides intensive hydration to the skin. Maintaining aging skin with adequate hydration can be done with this injectable. Each syringe can be used every 10 days, or 2 if you want to treat the neck as well, or even the hands. My plan being to just do the face then treat the neck next week. I just want to take my time until I get used to the procedure. Hyaron can be inserted meso style which is tiny

Microneedling- DIY For Beginners

 A more invasive treatment I actually have been doing for a while now is microneedling. I began with a dermaroller and worked my way up to a microneedle dermapen. I have what I assume is a dupe of the Dr Pen M8, it looks like the original but I bought it from Aliexpress so if it is a dupe it's an exact one. A derma pen comes complete with removable needle heads which I also buy the replacements from Aliexpress. Buying from this Chinese online store comes with risk, but I've found a seller that I trust so am not concerned. Anyway, I digress... I mostly microneedle at 1mm, which because it is over 0.5 mm it's classed as medical microneedling and is recommended to be done every 4-6 weeks. I do it monthly. For this depth I prefer to use a 16 pin needle head. The needle pricks in the skin promote scarless healing and encourages natural collagen building and improves texture and tone of the skin. Pores can appear reduced along with fine lines. I have been medically microneedling

First Time Trying Threads In My Face

 Well, I did a thing! Yes, I inserted some threads for the first time into my face. Although there are many places I would have liked to try and treat first, I began with my upper cheek region. Why? Because if you imagine threads as being scaffolding for the skin, one of the places where sagging begins is from the cheekbones down. Beauty DIY should be slow and steady, there is no rush. I started out with inserting 20 threads, 10 each side in a mesh pattern to create optimum structure. My experience with the threads wasn't as daunting as I had expected. I made sure to insert each needle bevel up which is the ideal position to penetrate the skin, beginning at a 30 degree angle then proceeding more flush to the skin upon inserting. You can numb before the procedure but I opted to do without and only felt discomfort when in the wrong plane, when in the correct position the needle glides through the skin with no pain whatsoever. Sometimes it can be frustrating when it seems like you can

Basic Info on Lifting Threads

Image
Thread lift procedurds have been gaining traction of late because they are minimally invasive with little to no down time, most common side effects being bruising and swelling. Threads are passed into the skin via a needle. The ideal placement being in the skin's subcutaneous layer. When in this plane there is no pain more so if too deep and less so if too shallow.  Depending on the thread and placement noticeable lifting may occur, however the real "magic" happens over time when the body creates collagen to break down the dissolvable suture, making for a more natural looking lift while tightening the skin. This lasts for approximately 6 months. Sound good? I think so, however it takes a lot of threads to create the collagen needed to really make a difference. At an average rate of $120 a thread or $2500 for your face in office per treatment that's a cost that I just cannot justify. So I have made the decision to insert these threads myself. Choosing thread size and t

Beginning of My DIY Beauty Journey

Image
  Well, long long time since my last blog post which was in 2019, eek! I have just found that over time although I still enjoy makeup, and skincare is a must, I have had no desire to share makeup posts. To be honest, at the age of 47 I no longer feel that I am as confident about sharing so many face-of-the-day selfies, and skincare doesn't seem to wow me as much now that I have so many signs of aging (I am a frugal gal who prefers more budget friendly buys). Don't get me wrong, I want to age gracefully, I don't need to look decades younger I just want to look good for my age. The following photos are without makeup or filter and show the many signs of aging I have. There are so many procedures I would like to have done to tighten my skin, lessen wrinkles, help my aging under eye area and don't get me started on my neck....and so on! But I have one thing that prevents me from doing these things and that's my bank balance which just doesn't have the funds to cough