Posts

Showing posts with the label Orly Bonder

Glitter Gradient Nails

Image
I had decided that I wanted to create a glitter gradient look for my nails, I had even chosen the glitter polish that I wanted to use. What I did have trouble with was the base colour that I was going to apply. My solution? Different base colours! The hero of this mani being the glitter polish Glinting Lodestone from Aussie indie company Femme Fatale. I hope you like my gradient version, I need to try some different variations. I'm sure a warm orange/red would be interesting, what do you think?

Glitter Gradient Nails

Image
I love glitter on nails, normally I just cannot get enough! For something a little different, I thought that I would try creating a gradient nail using a glitter polish. This meant that I had to control the amount of glitter applied to my nails, could I do it?? After one coat of Orly Bonder base coat, a step that I now no longer miss when applying regular polish, I applied 2 coats of Orly Liquid Vinyl. This is one of my favourite black polishes, especially if I'm using it as a base colour. One coat would probably be enough, but 2 gives a more even finish.  Wanting to incorporate an accent nail, I applied Sinful Colors Under 18 polish to both ring finger nails. Sinful Colors have such an array of shades that I always find it hard to choose colours. Under 18 is such a rich,  vibrant red colour, leaning towards orange. What a way to warm up this dreary weather! As with most polishes I use, I applied 2 coats. Over the base colour, I applied Femme Fatale Tricky Treat glitte...

NOTD- Mosaic Nails

Image
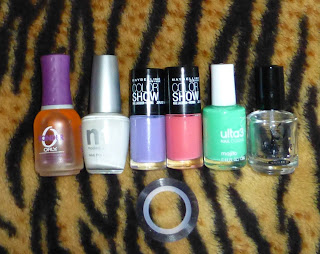
I wanted to try colour blocking for my nails. I'd seen the trend many times, but hadn't tried it for myself. I decided to choose Mod style colours, as I thought these would be perfect for stand-out nails.  Because I wanted to incorporate striping, I began with a white base over Orly Bonder, using Models Inc polish in White. With this polish 2 coats gives an opaque finish. Once the layers had dried completely (patience is a must, eek!) I could begin with the next step, the nail striping. I haphazardly placed the tape on my nails to separate each nail into 3 parts. For each section I chose to use Ulta3 in Mojito, a bright pastel green, Maybelline Color Show polishes in Coral Crush and Iced Queen, a mauve colour.  I picked up the Maybelline Color Show polishes from Chemist Warehouse when they were on sale. Most of the colours had already sold out, but I was lucky enough to find these gorgeous polishes.  I am yet to try these polishes on their own, but so far love the c...

Anniversary Nails

Image
My husband and I hit a milestone today..it's our 10th Wedding Anniversary! So, as with most special occasions, I must create themed nails :) It took me a while to decide on a design, but finally decided on a way to incorporate both of our favourite colours, green and pink.  After my base coat of choice, Orly Bonder, (no surprise there) I applied Blush-Amour no 32 for a base colour. This is a gorgeous pearl white colour. It is quite a sheer shade. The next coat of this colour was rather thick, I didn't want it drying in a hurry.  Next I applied dots of  Sally Hansen HD polishes in Pixel Pretty and Digital, both gorgeous metallic colours. I only applied these dots to the top half of my nails.  I also added a couple of dots of Blush-Amour in a shimmery gold, which I seemed to have left out of the pic, oops!! Blush-Amour can be found at select "cheapie" stores, I think I paid $2 each, and I must say that the quality is quite decent.  Moving quickl...

Smouldering Nails

Image
I really can't seem to get the hang of the gradient nail design, but I'll keep trying. In saying that, I was content with the overall look of my nails.  After applying Orly Bonder base coat, I applied a coat of MUD nail polish. I am not supposed to buy nail polishes until I start using some up, but find it so hard to pass a bargain price. I hadn't tried this brand before, but I thought at $2, I had nothing to lose. I like the creme formula, and think it's quite a decent polish for the price. Next, I painted 2 vertical lines of nail polish onto the make up sponge, ensuring that Models Inc nail polish in Deep Plum was applied to my tips. The lighter red colour, Sally Hansen Laquer Shine in Dazzling (such a divine red!) I used as a colour to blend the deeper red with the peachy creme colour. I then patted the sponge onto the top half of my nails. Attempting gradient nails I find difficult for some reason, however, I am learning that being generous with ...

Easter EOTD and nails

Image
What better reason to play with fun, bright colours than Easter. I decided to double the fun by doing an EOTD and NOTD. My nails came first, I chose a few bright colours, then went from there. This is the result: These are the products that I used As you can see that apart from my usual base and top coats, I chose Ulta3 nail polishes. I bought them because they were so cheap and with plenty of colour choices. I decided that these polishes would be perfect, not only for the colours, but also the creme finish. I used the shades Mojito, Honolulu and Party Shoes. I began with a coat of aqua green. I let the coat dry before placing a french mani sticker midway across my nails. I then painted the pink over the top. I wish I had have let it dry completely before getting impatient and peeling the stickers off. This caused some of the pink to lift off, unfortunately. I then used a dotting tool to add yellow dots to the mani. The nail look was fun, but I thought I would use thi...

NOTD- Rainbow Ice-cream

Image
I have attempted water marbling many times, and failed miserably. I've watched a few youtube tutorials to on water marbling and came across a tutorial that didn't require water. I had to try it. I wanted something subtle, yet opaque as a base colour. So after applying Orly Bonder base coat, I applied 2 coats of NYC Lolly Pop. A nice frosted muted pink, that is a nice soft look that is not too loud when gaps are visible between the marbled colours. My next step was to apply large dots of colour from my nail art polishes on various parts of my nail, doing one nail at a time. I chose purple, candy pink and a shimmery green to achieve this. Before the nail polish dried, I used a cuticle stick to swirl the colours. I found that the thicker formula of the nail art polishes make it easier to work with because they are opaque and don't dry too quickly. I finished my nails with Seche Vite top coat, to not only seal my nail look, but to also fill any unevenness cause...

NOTD- Wet Paint

Image
I bought some nail art polishes from Ebay such a long time ago, and hardly ever use them. They were just some cheapies, but I thought they'd be fun, and great for practising. I had already decided I was going to use a purple base colour and just wanted to add a splash of colour. I opened my top nail polish drawer that contain the nail art polishes. After some deliberation, I just couldn't go past the red, definitely a splash of colour..a very noticeable splash of colour, lol. After applying Orly Bonder base coat, I went ahead and applied Borghese Rapido nail polish. It is only labelled as a numbered shade. I'd never heard of this brand of nail polish before, but I came across it in one of my favourite ways of shopping..in a bargain bin :) The colour just stood out, and I had to have it. My nails required 3 coats to get a nice opaque colour that wasn't streaky. It is quite a thin formula, but it does dry quickly, so applying 3 coats isn't that much of a dr...

NOTD- A Touch of Class, A Touch of Glitter

Image
In the hope of creating a new look for my nails, I reached for my nifty little nail stickers. I bought a bunch from ebay, so had a nice selection to choose from. I really wanted to use a silver nail polish for my base colour, so decided that black stickers would contrast nicely. Of course, Orly Bonder was applied first, as this base coat is FABULOUS :) I then applied 2 coats of Naturistics nail polish in Chrome Crazy. I had not only never used this brand of nail polish before, but had not even heard of it. I just happened to come across it, thanks to an ebay store selling cheap nail polish. This is such a striking silver colour, that gave me perfect coverage after 2 applications. Next were the stickers. I began with the graduating flower stickers. I went ahead with a feature nail, and applied the extra flower sticker to my ring fingers. Although, the cute black designs on a silver backdrop looked fine, I felt that I needed a touch of colour. This is where I reached for Sati...

Flaming Orange Nails

Image
On my nails, I wanted sparkles, and I wanted colour. Well, I certainly got both with this nail look :) I started with a coat of Orly Bonder, my must have base coat. After having nail polish last almost chip free for almost a week, instead of a couple of days (if that!) It is totally worth including this step when applying nail polish. For the base colour, I chose Rimmel Play Fast nail polish in Mouthy, a golden orange. It applied on the sheer side, so it took 3 coats for a coverage that I was content with. For the sparkle element of this look, I used Femme Fatale Tricky Treat from the Halloween collection (a review of my latest Femme Fatale purchase will follow in the not-too-distant future). This polish contains orange, fuchsia and dark glitter, there are also lengths of gold. To achieve plenty of sparkle, I had to apply 4 coats. I love the finish of this polish, the only con is that some of the gold strips come away from my nail, however, gently pulling ...

Australia Day Nails

Image
With Australia Day approaching, I wanted to try a fun, yet simple nail look. I had so many ideas, but finally decided on this design This is what I used: I began with my much loved Orly Bonder. Never being one to find this step important, I now find this base coat invaluable to the longevity of my nail polish. I am rough on my nails. The saying "Nails are not tools" certainly doesn't apply to me! :/  The sticky base seems to bond the polish to my nails. I have tried Creative Sitcky Base, but Orly Bonder works so much better for me! I don't have many green nail polishes, especially a brighter green, it's just not a colour that I feel the need to reach for. Just as I was about to settle with a dark green, I stumbled across Sally Hansen Xtreme Hard Wear Nails in Ivy League. I don't actually remember purchasing this polish, but I'm so glad that I did :) Next was the yellow star design. I have had some cheap nail art polishes that I purchased fr...