Posts

Showing posts with the label Seche Vite

NOTD

Image
Endevouring to play with my Sally Hansen Matte Top Coat again, I went with an idea that I had found on Pinterest (boy, can I get lost in the world of Pinterest!) I started with a dark base coat, using Avon Nailwear Pro "Night Violet". I then added Max Factor "Fire Within" (LOVE this!) Then I applied Sally Hansen Matte Top coat only onto diagonal sections of my nails. I finished with dots of Seche Vite, using a toothpick. I really like these 2 finishes together. The shimmer of the Max Factor "Fire Within" is interesting when muted with Matte top coat, I prefer it glossy, but like the contrast of the matte and gloss.

Leopard Print NOTD

Image
I just love Leopard print nails. I can think of so many combinations and ways of showcasing this design. I've stamped the design on before, but I like the look of the design done freehand. What was holding me back was not feeling that I could create an acceptable leopard print design. Finally, I took the plunge, what could I lose? Polish remover has erased many a bad nail look. After applying OPI Passion for my base colour (which I neglected to include in the pic, oops!), I then added a coat of Essie Pure Pearlfection for a touch of shimmer. Once the coats were dry, I dabbed Essie Your Hut Or Mine in desired edges of my nails, apart from my accent nail, where Your Hut Or Mine is the base colour and Models Prefer Flushed used for the Leopard spots. To finish off the spots, I used a brush to define with Orly Liquid Vinyl. A coat of Seche Vite top coat finished my mani. Now that I've discovered that I can create a passable leopard print, I now want to try other idea...

Water Colour Nails

Image
A couple of nail looks that I had never tried before was attempting a reverse stamping design and water colour nail design. Reverse stamping is a technique where to complete, I used a ziplock bag to paint a nail sized square of clear polish. Once dry, you stamp the nail design you wish to use, then place on the nail like a decal, I placed it on a wet coat of clear top coat. Sounds easy enough, right? Yes, well as you'll be able to see, I didn't quite get the finish that I wanted. The water colour design, however, I was content with. Once a base colour is dry, you dot on various nail colours, working quickly on one nail at a time. I used the ziplock bag again to flatten the dots of colour. Simple, and so many variations can be experimented with. Because I wanted to use bright polishes, I used a white base, Maybelline Color Show Porcelain Party. The dots of colour  came from Models Inc Fluro Pink, Sally Hansen Xtreme Wear Blizzard Blue and Ulta3 Mojito. For the stamping, I...

Glitter Topper Nails

Image
I love sparkly things, but for my eyes I want shimmer not glitter. What do I do with glitter eye shadow? Put it on my nails!  When I placed an order with Mon Ennui, I ordered some colour shifting eye shadow, I didn't realise how large the glitter was in some of the samples, so the 4 jars sat unused in a make up draw. When I say unused, I don't mean not admired, as I'd often pick the jars up and be mesmerized by the gorgeous colours. Desperately wanting to use them, I decided I'd try applying on my nails. For the base colour, I decided to use Essie Da Bush.  Whilst the second coat was still wet, I sprinkled Mon Ennui Siren over the top. To even out the surface, I applied to thick coats of Seche Vite. I included so many pics to try and capture the sparkle and gorgeous colour of the glitter. I have 3 other glitter eye shadows from Mon Ennui that I'll be sure to post when I apply those to my nails :)

Glitter Gradient Nails

Image
I had decided that I wanted to create a glitter gradient look for my nails, I had even chosen the glitter polish that I wanted to use. What I did have trouble with was the base colour that I was going to apply. My solution? Different base colours! The hero of this mani being the glitter polish Glinting Lodestone from Aussie indie company Femme Fatale. I hope you like my gradient version, I need to try some different variations. I'm sure a warm orange/red would be interesting, what do you think?

NOTD featuring Australis Crystal Top Coat

Image
Some time ago, the new polishes offered by Australis really caught my eye, especially Crystal Top Coat. With the beautiful holographic crystal flakies, I just had to have it. I can't believe that I have had it so long and haven't used it until now! Recommended to use over a dark base, I had seen just how good the top coat looked over black.  I wanted to try something deep, yet not black. I'm not great at creating an Ombre nail, but I thought it could make for a fun base colour for the Crystal top coat. For the Ombre, I used Sally Hansen's Xtreme in Blizzard Blue and Lancome, not sure on the shade name as the label has worn off, but it's a gorgeous deep sapphire blue. Once the base colour had dried, I then applied Australis Crystal Top Coat. For added protection of the mani, to increase wear time, I still finished the mani with Seche Vite top coat. The first pic is true to colour, I included the other pics to try and capture the gorgeous...

Stormy NOTD

Image
Although I generally reach for bright and/or bold nail polish when deciding on a colour for my nails, I recently wanted something different. A colour that I can't remember wearing is grey. It may sound like a boring shade, but I think it can look quite classy. Seeing that grey is such a rarity for me, one shade was not going to be enough.  After my mandatory Orly Bonder base coat, I applied the lightest polish, Essie Da Bush as the base colour. Next, using a sponge eye shadow applicator, I dabbed Essie Fair Game from halfway up, to the tip of my nails. I then repeated this step with Orly Liquid Vinyl (not grey, I know, but black finishes the look, I think) concentrating on the tips. To add a sprinkle of shimmer, I applied Essie Pure Pearlfection, I just love the effect this polish gives. Then finished with Seche Vite top coat. It's nice to try a different shade :)

Glitter Gradient Nails

Image
I love glitter on nails, normally I just cannot get enough! For something a little different, I thought that I would try creating a gradient nail using a glitter polish. This meant that I had to control the amount of glitter applied to my nails, could I do it?? After one coat of Orly Bonder base coat, a step that I now no longer miss when applying regular polish, I applied 2 coats of Orly Liquid Vinyl. This is one of my favourite black polishes, especially if I'm using it as a base colour. One coat would probably be enough, but 2 gives a more even finish.  Wanting to incorporate an accent nail, I applied Sinful Colors Under 18 polish to both ring finger nails. Sinful Colors have such an array of shades that I always find it hard to choose colours. Under 18 is such a rich,  vibrant red colour, leaning towards orange. What a way to warm up this dreary weather! As with most polishes I use, I applied 2 coats. Over the base colour, I applied Femme Fatale Tricky Treat glitte...

NOTD- Mosaic Nails

Image
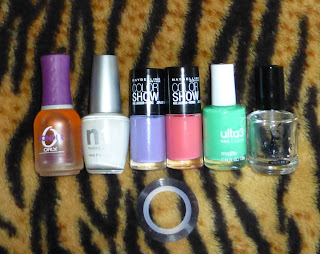
I wanted to try colour blocking for my nails. I'd seen the trend many times, but hadn't tried it for myself. I decided to choose Mod style colours, as I thought these would be perfect for stand-out nails.  Because I wanted to incorporate striping, I began with a white base over Orly Bonder, using Models Inc polish in White. With this polish 2 coats gives an opaque finish. Once the layers had dried completely (patience is a must, eek!) I could begin with the next step, the nail striping. I haphazardly placed the tape on my nails to separate each nail into 3 parts. For each section I chose to use Ulta3 in Mojito, a bright pastel green, Maybelline Color Show polishes in Coral Crush and Iced Queen, a mauve colour.  I picked up the Maybelline Color Show polishes from Chemist Warehouse when they were on sale. Most of the colours had already sold out, but I was lucky enough to find these gorgeous polishes.  I am yet to try these polishes on their own, but so far love the c...

Anniversary Nails

Image
My husband and I hit a milestone today..it's our 10th Wedding Anniversary! So, as with most special occasions, I must create themed nails :) It took me a while to decide on a design, but finally decided on a way to incorporate both of our favourite colours, green and pink.  After my base coat of choice, Orly Bonder, (no surprise there) I applied Blush-Amour no 32 for a base colour. This is a gorgeous pearl white colour. It is quite a sheer shade. The next coat of this colour was rather thick, I didn't want it drying in a hurry.  Next I applied dots of  Sally Hansen HD polishes in Pixel Pretty and Digital, both gorgeous metallic colours. I only applied these dots to the top half of my nails.  I also added a couple of dots of Blush-Amour in a shimmery gold, which I seemed to have left out of the pic, oops!! Blush-Amour can be found at select "cheapie" stores, I think I paid $2 each, and I must say that the quality is quite decent.  Moving quickl...

Smouldering Nails

Image
I really can't seem to get the hang of the gradient nail design, but I'll keep trying. In saying that, I was content with the overall look of my nails.  After applying Orly Bonder base coat, I applied a coat of MUD nail polish. I am not supposed to buy nail polishes until I start using some up, but find it so hard to pass a bargain price. I hadn't tried this brand before, but I thought at $2, I had nothing to lose. I like the creme formula, and think it's quite a decent polish for the price. Next, I painted 2 vertical lines of nail polish onto the make up sponge, ensuring that Models Inc nail polish in Deep Plum was applied to my tips. The lighter red colour, Sally Hansen Laquer Shine in Dazzling (such a divine red!) I used as a colour to blend the deeper red with the peachy creme colour. I then patted the sponge onto the top half of my nails. Attempting gradient nails I find difficult for some reason, however, I am learning that being generous with ...