Posts

Showing posts with the label NOTD

Quick Halloween Nail Look

Image
I had good intentions to create Halloween makeup and nail looks, but life has gotten in the way, so I created some easy nail art. I began with a grey base coat. I used Essence nail polish The Dawn Has Broken. I then used a sponge to dab on some black then white nail polish. I was going for an old headstone look. To add a little creepy factor, I used Mirenesse nail polish in Burlesque, a red shade, to replicate dripping blood. Hmmm, not overly Halloween-y, but I had fun creating it.

Simply Nails 2017 #6

Image
On my favourite online forum, you've probably guessed it's Beauty Heaven, a thread was started for nail art challenges for anyone interested in being involved. Essentially, a couple of colours are chosen to use in a nail look. I thought I would also share with you my effort of this week's "Green and Blue" challenge. You know the rule "Blue and green should never be seen..." well, I'm one that doesn't follow colour rules. Whether it be certain colours for the season to what colours should not be paired. I like to play with any combo, so I was excited to do a green and blue nail. I chose Ulta3 Mojito, Boe Beauty Blue Illusion and a Kleancolor shimmer topper. I painted the green first, then sponged on the blue just to the 2nd half of my nail to create an ombre. For a sparkly final touch I painted 2 coats of the green tinted base with a golden holographic shimmer. Thanks for reading xx

Simply Nails #5

Image
I really do like to create a lot of purple nail looks and today I have yet another one to show you. What can I say? I love purple! I started with Australis Nail Colour in #bethatgirl for my base colour. I then used a fine brush to paint small stripes of the frosted blue polish You Blew Me Away from FOA. That's it, so easy! Thanks for reading! xx

Simply Nails 2017 #4

Image
A cold and rainy afternoon sounds like the perfect excuse for me to fill in some time by doing my nails. I wanted an ombre style mani, but using a brush instead of a sponge. I used a fine tipped nail art brush. I used OPI Designer de Better for my base colour. It's a gorgeous champagne shade.  On an old plastic drink cup lid I placed drops of Sally Hansen Life, a very yellow gold, Sally Hansen Antique Bronze and Sally Hansen Save The Date, a deep plum.  Using a nail art brush, I dipped into each colour, starting from lightest to darkest, painting strokes of nail polish across my nail. I also added a star embellishment on my middle fingers.  To finish off the nails I applied LA Colors Sassy Sparkle, holographic shimmer in a clear base, it's so pretty. I think this look has a beachy vibe to it, I'd love to try blue and green to go with the yellow next time I try this technique.

Simply Nails 2017 #3

Image
Lately I have been trying to get my nail polish mojo back again. I used to apply nail polish at least twice a week, but doing it even once a week seems to be an achievement. I have so much nail polish that I really need to make it my mission to apply it more! Lol. Anyway, I will be showing you a nail look that I recently created, I'm just hoping this becomes a more regular thing. I wanted to do something easy, but looked creative. I wanted a dark base, with lighter colours to be swirled through the base. For my base colour, I chose Models Inc Mid Nite Blue. I applied 2 coats, whilst the 2nd coat was still wet, I dotted on both Maybelline Color Show Iced Queen and Essie Your Hut Or Mine.  I then dragged a fine brush through the colours. This technique created some pretty interesting designs on the nail, plus it works quite well on even my stumpy short nails :) I've added this post to Ingrid's Monday Makeup Madness Link-Up Party.  ...

Simply Nails 2017 #2

Image
I was gifted some pretty nail art designs and cute embellishments from a lovely lady from Portugal who I am friends with on Instagram. Her account is @sarahpequena. She sells them, but sent some to me with no expectations of blog post or review purposes. The hardest part was choosing what to use first! I decided to use some of the blue diamantes, which went perfectly with the one in the floral design positioned in the 3rd row, last 2.  To go with the blue theme, I wanted a purple toned ombre. I chose Models Inc Opalescent as a base colour, using 2 coats.  To create the ombre, I painted a line of Opalescent onto a sponge repeating with a line of Australis #bethatgirl right next to it, overlapping slightly. I then positioned the sponge so that the purple polish would be placed on the tips of my nails. With a dabbing motion, moving up and down slightly, I was able to create the ombre. I hope I'm making sense! If you google ombre or gradient nails, there's ...

Simply Nails 2017 #1

Image
I recently de-cluttered some crackle polishes that had dried up. I remember when they were a thing, although I bought a few, I really didn't get much use out of them. I was looking for a colour for my nails in my stash, when this gorgeous magenta shade was calling me. When I picked it up, I realised it was a crackle polish that I had forgotten about. Surprisingly, the Maybelline Shredded nail polish in Magenta Mirage had not only survived the cull, but was also usable . My next decision was what my base polish would be. I figured that a silver would stand out underneath Magenta Mirage and also compliment the stunning magenta shade. I chose to use Naturalistics Nail Gloss in Chrome Crazy. A bright metallic silver. I quite like the result, and let's just say that this crackle polish has survived and remains in my nail polish collection!

Nail Art 2017 #1

Image
I was inspired to create my mani after seeing a tutorial on Facebook. It looked fairly easy and I just loved the finished look. A dotticure, but not just any dotticure, the dots being multi-toned. I'll explain... Once I decided I wanted warm colours on my nails, I needed to begin with a dark base colour. For this I chose Sally Hansen Diamond Strength polish in Save the Date. For the dots I began with a combination of Sally Hansen Xtreme Wear polish in White On, Models Prefer Nail Color in Trendy and Ulta3 Nail Color in Honolulu. With the smaller end of my chosen dotting tool I slightly mixed the polishes so that the individual colours were still obvious. I then proceeded to place dots on my nails with the swirled polish using the larger end of the dotting tool. I definitely want to try some different colours using this technique!

Christmas Nails #2

Image
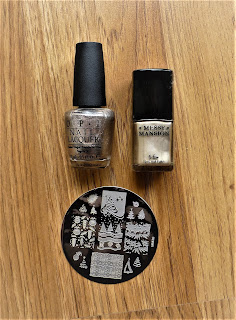
I had grand plans to create more than two Chrismas manis this year but alas life got in the way. Things have been so hectic! Tis the season! If you didn't see my first Christmas mani you can check it out here . For this nail look I wanted to pull out my Christmas themed stamping plates. I had the amazing idea to stamp with a deeper gold on a lighter gold base. Sounded good in my head, but turned out a lot more subtle than what I had envisioned.  I applied OPI Designer de Better as my base colour, then using Messy Mansion Soft Gold, I stamped on the Christmas designs. I liked the result, but it was very hard to capture with my camera. Oh well. What are your plans for Christmas? I hope you have a wonderful time no matter what you are doing! xx

Christmas Nails 2016 #1

Image
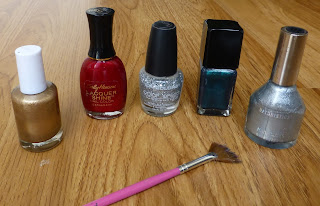
Of course I couldn't let December go by without creating some Festive nails. Rather than a design, I wanted to incorporate some colours that came to mind when I thought of the Christmas season. Those colours being gold, silver, red and green.  Alternating each nail I applied gold and silver base colours, Naturistics "Chrome Crazy" and a gold polish that has no label whatsoever on it, helpful! Lol. With a small fan brush on each nail I painted stripes of green and red polish, Illamasqua "Viridian" and Sally Hansen Lacquer Shine in "Dazzling".  As much colour as I had going on, I couldn't resist a little sparkle so finished with a coat of LA Colors "Glitter Bomb".  Do you do something special on your nails for Christmas?

'Tis The Season- Christmas Nails

Image
Nothing represents Christmas to me more than the sparkle of tinsel. I decided to try and recreate this on my nails. Sally Hansen "Dazzling" and Illamasqua "Viridian" Red and green are very festive colours, so I alternated these base colours on my nails. Then using some clear polish for adhesive, I sprinkled on the gold and purple glitter on each nail. I hope you have a wonderful and safe Christmas xx

Nail Art Wednesday

Image
If you follow Kat on Instagram , you would have been delighted by her wonderful photos of various flowers. It was viewing these photos that inspired this nail look. Models Inc "Diamond Shine", Australis "#bethatgirl", Ulta3 "Honolulu and Australis "Glitter Strikes Back" I began with a champagne base colour. On the fingers that I wanted to replicate a flower design, I applied another coat of the base polish. While still wet, I dotted on the purple polish, then yellow in the centre. Using a toothpick, I dragged the yellow polish out from the middle, in the hope of creating a design reminiscent of a pansy. On the remaining nails I applied the glitter topper, "Empire Strikes Back". I hope I did justice to these beautiful flowers :) I just linked this post to Monday Makeup Madness over at Fabulous and Fun Life  

Maybelline Color Show in "Avante Green"

Image
Maybelline Color Show nail polishes have so many shades on offer. I just love to check out the displays to see what new colours have been released. They are very budget friendly, and pretty good quality, too. The pretty green colour of "Avante Green" was calling me. The lure of metallic finished products is a weakness of mine. Isn't that forest green just so lush! I did need 3 coats for an opaque finish. The "extra" effort was so worth it! :)

LA Colors "Flamenco"

Image
As you know, I am a nail polish junkie. I enjoy most colours and there are some that just catch me by surprise when I apply them to my nails. This is how I felt when I decided to try on LA Colors "Flamenco". I adore pinks, corals and reds, so I knew I was going to like the shimmery orange-y red shade. Oh my, when this colour was on my nails, I couldn't help but stare at them, especially outdoors where it sparkled in its sizzling glory. Without further ado, here she is! "Flamenco" is stunning. After 2 coats it is barely opaque, which normally I don't like, but for this colour I can forgive :)

Nail Art Wednesday

Image
I've created a leopard print mani in the past and wanted to re-visit this fun and fairly easy to do pattern on my nails. OPI "Taupe-less Showgirls", Orly "Liquid Vinyl" and Sinful Colors "Boom Boom".  I love pink leopard print, I think it's so cute. I also wanted to change things up a bit, and try a pink and gold base, and then alternate the same polishes for the spots. I went for a golden champagne colour and a nice bright pink cream polish. My trusty Orly "Liquid Vinyl" was used to finish the leopard print. I adore the colour combo, I think they work well to compliment each other. Do you like the popular leopard print also?

Come Play With Me- The Spooky Edition

Image
I couldn't let Halloween go by without creating a fitting theme for Come Play With Me. I chose to include a spooky face and also Halloween themed nails. It's been a while since I have gone crazy with makeup and had some fun doing it. I'll begin with the face. I wanted to try and create a ventriloquist doll look. I find them very creepy, so yay! Great for Halloween! I received the Stargazer pressed powder in an Ozsale order, I didn't buy it, but decided to keep it. White powder can be handy for Halloween, lol. I used this for my face base, it was terrible and patchy, so I added some LA Girl white eye primer and blended that out. My white base was far from even, it wasn't the most fun part of creating the look. My eyes were very easy. I used a light neutral shade for my lid, then deepened the crease with a dark brown, and just blended it out. I used NYX Jumbo liner in "Milk" to line a thick white lower water line. Some brow liner and mascara ...