Posts

Showing posts from 2023

Round 3 of Hanheal Exosomes

 I'm so glad I checked my DIY calender because I was about to fibroblast my lips not realising it was time to inject some Hanheal Exosomes. I was surprised a month had gone since my last round. The second half of this year is passing by way too quickly. How are we so close to Christmas???? Anyway, back to the subject of this blog post, Hanheal Exosomes. Although the product needs to be mixed before injecting, it is so easy. The fluid is poured into the vial of powder. Only a little amount of mixing is needed for the powder to be dissolved, so it's a step that is not difficult. I also love just how easy the thin consistency is to draw up into a syringe. Although I could draw it up with the 30 gauge by 4 mm needle tip I use for injecting, however, I find it quicker to just use a drawing needle tip. It's just a larger gauge and longer length and because I am not using the needle to inject product, I don't have to worry about it getting blunt by scraping the glass vial.  Ok
Treating My Skin With Hyaron

 When it comes to a simple, no frills injectables I like to reach for Hyaron. I know I have mentioned this product in the past, but I thought I would share another post about just how much I love it. It contains a highly purified hyaluronic acid that is safe to inject into the skin. It can be used topically too, but because I can make my own HA serum for a much cheaper price, I prefer to save it for injecting. Hyaron provides the perfect hit of hydration for the skin, espcially for those with a more mature skin. It helps to provide radiance and reduce those fine lines. I also appreciate that the product comes in a prefilled syringe. All that is needed is to attach a needle tip, I use a 30 gauge by 4 mm one. The product is thin enough for BAP mapping, where you can inject more into less spots than the many injections needed for mesotherapy because the product spreads easily. It is a fantastic product for beginners because it's not painful to inject and is less likely to cause a reac

PDO Threads in My Lips

 Yes, you read that right. I inserted PDO threads into my lips. I must be a glutton for punishment! I used my favourite sized threads 30 gauge by 25 mm, a smaller size would have fit into the lip areas better, however shorter threads can be a bit temperamental and often don't stay in place and follow the needle out. An issue I don't want to deal with, to be honest because I don't want to waste threads. This was not an easy procedure for me. It is quite a painful area to pierce with a needle. Also the contours of the lips can make getting into the right plane more difficult. I even broke through my inner lip twice! So why did I do it? To try and rejuvenate my aging lips with collagen building. A couple of bruises later and discomfort for a few days when eating, I really hope doing this to myself was worth it, lol. As I've said before, patience is important and it takes many threads to improve the skin. Let me tell you, I am not looking forward to doing this again. That n

Round 2 of Hanheal Exosomes

With all the Hanheal Exosome claims it certainly sounds like a miracle product. After my first use apart from the beautiful feel to my skin, I was skeptical that I was going to achieve the benefits promised such as tightening, brightening and reduction in fine lines. In spite of this, I was looking forward to my second round because it's an easy to inject product with plenty to treat with, being that there is 5 ml of product, as long as I am more mindful with application. I injected my lips first, then proceeded to treat my forehead with a more conservative hand than the first time. My next area I treated was under my eyes, mainly injecting just above my orbital bone to avoid bruising. I then treated the crease on my chin with 4 injections spaced out evenly. I decided to treat the rest of my face using points that would allow product to spread for optimum treatment. I did not experience any long lasting swelling or irritation. Once again I was wowed by just how silky smooth my skin

Fibroblasting NLFs and DAOs

  Back again with some fibroblasting where I burn tiny holes into areas of my face I want tightening. Thanks to gravity not being my friend, I have laxity in my skin, especially my nasolabial folds and marionette lines.  From research, to tighten lines it is best to fibroblast on either side of the line so that the skin can tighten between the burns, thus reducing the wrinkle. So that's what I did by creating a couple of rows of burn dots running along both sides of my NFLs, I then proceeded to continue down my marionette lines, concentrating on the looser skin from the corners of my mouth.  I find that resting my elbow on a firm surface makes the procedure easier. That first dot after each break is the hardest, but once I get on a roll it becomes easier. Next time I fibroblast, probably in a month's time, I plan to do my upper lip lines. For this I will definitely numb! Check out my  Link.Tree  for socials and affiliates :)

Eye Threads

 After my last attempt at treating under my eyes with threads that resulted in bad bruising and swelling I was hesitant to try again. Unfortunately my under eyes are a concern for me, especially the dark circles and hollows. Over time threads are one of the best ways to rejuvenate the area and provide volume. Sure, filler would be quicker, but I'm not at the level of using filler and it can make the area look worse, especially if migration happens. Anyway, my point being that if I wanted to make improvements I had to treat with threads. Fortunately there are eye threads avaiable. These needles have a blunt end rather than sharp, also known as cannulas and go around a vein rather than pierce it, making bruising much less likely. Just to insert the needle, I pilot hole must be made using a sharp needle tip that is a slightly bigger gauge than the thread needle. The threads I had were 30g x 25mm and the pilot needle 27g x 13mm. I used the pilot needle above my orbital bone underneath

Fibroblasting Above Brows

 I've had to delay this procedure for longer than I wanted to, so was glad when I could finally fit in another fibroblasting session. I wanted to continue with the eye area and treat above my brows which by tightening in turn helps with my hooded lids. Of course each treatment will only produce subtle benefit, so will be a long process of many treatments, but I've got to start somewhere, right?  I didn't use numbing cream for this procedure and thought this might have been a bad choice, however it really wasn't too painful. Sure it wasn't pleasant but certainly tolerable. If you can imagine outlining cat ears above my eye brows, that was the pattern I used with the peak being above that of my eyebrow arch. The goal was to try and recreate a dice pattern, however during the fibroblasting, I just made sure to place dots without burning my skin too much I just wanted dots to try and avoid scarring. On the most part I was able to achieve this. I was surprised with how l

First Time Trying Hanheal Exosomes

 I've been wanting to try Hanheal Exosomes for some time, however, I first wanted to use the other injectibles in my rotation seperately. Exosomes are yet another way to encourage collagen production, imperative to antiaging. Also important is elastin production which is increased by 300 %. Exosomes are derived from healthy human cells, these cells are fibroblasted dermally so that they can target unhealthy cells that may be causing fine lines, saggy skin, age spots, uneven skin, acne. Sounds amazing, right? Well, I'm willing to put this product to the test to find out. With 5 vials and a plan of attack to use monthly, I have enough for 5 months.  I used a 30g x 4mm needle to inject the Exosomes. It was on the thicker side, but was not painful during injection.  I got the lips out of the way first, injecting 8 points in total. I then went ahead and injected my forehead meso style, using a little every cm or so. As previously stated, I prefer the BAP mapping with less injections

Threads For The Jowls

 I just love threads to target various saggy skin concerns. for both prevention and cure. Expectations however do need to be realistic. Years have created various issues so it's expected that visible results are going to take lots of threads and time. I had planned to treat my jawline with the packet of 20 29 gauge by 38mm PCL threads but changed my mind at the last minute to instead target my jowls and in turn building structure to firm my marionette lines where my skin is becoming lax. I just inserted the threads vertically, with 10 on each side. I must say I was surprised with just how easy these threads were to place in this area. I have used them before and found that they were flexible making them more difficult to push into the skin. Not in this area, so it was a nice surprise! I did get a bruise at the entrance areas, but both of them are not very noticeable. I'm happy with how this treatment went and fingers are crossed for some firmness in this area. Check out my  Lin

Current Skincare Routine

Image
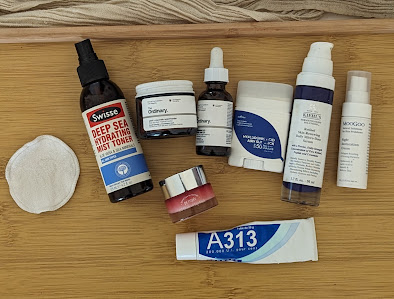
 My plan to fibroblast above my brows was shelved thanks to my hubby inviting some friends over on the weekend. Not wanting to have to explain the effects of the mole pen, but still wanting to have a blog post, I decided that instead I would show you my morning and evening skincare routines. Since regularly doing more invasive beauty treatments, I have really simplified my skincare routine. The brand of the products may change but the type of products remain the same. AM- Cleanse my face with water, using a facial cleansing cloth Hydrating toning mist Vitamin C serum Sunscreen, lately I have been preferring to use a sunscreen stick. Yep, that's it! I believe vitamin C is important and is a contant in my skincare routine. Now that I use hydrating injectables, I know longer feel the need for a daily moisturiser. PM- I like to use a cleanser at night to make sure I'm removing the sunscreen. I then alternate between a retinol product 3 times a week and then for 2 nights I add 3 dro

Mid-face Thread Treatment

 Gravity is not our friend when it comes to aging, so in an attempt to reduce my nasolabial folds that continue to deepen I decided it was time to treat my mid face with threads. I chose 27 gauge by 38 mm PCL threads and inserted 7 horizontally from the inner part of the NLF crease towards my outer face on each side. The remaining 6, I used 3 on each side inserting vertically into and either side of the NFLs. My aim is that by giving structure to that area with threads not only should it reduce the NFLs, but also help prevent further sagging of the jowls. It takes up to 2 years to dissolve PCL threads which in that time encourages collagen building and firmness. Well, that's the hope. It does take a lot of threads to do this, so paience is key. Check out my  Link.Tree  for socials and affiliates :) 

Last Round of Curenex

 Well I just wrapped up another injectable treatment regime. As I've stated before Curenex Rejuvenating Solution was an easy product to inject. A thin product that was not painful. I also loved that there was 5 ml to play with. As before, I began by injecting my lips first because I find it the most uncomfortable area to puncture with a needle. FYI, an ice roller makes a huge difference in reducing the level of discomfort. I then went ahead with the BAP mapping starting at the modified forehead injection points being between the brows and 2 halfway up my forehead using my pupils as guides. There is only a thin layer of flesh on the forehead which makes injecting another pinchy place so I like to get this done early on in the procedure. I was careful to not be heavy handed so had plenty of product leftover to treat not only my under eyes, but another 2 spots above my jaw and above the spot between my brows.  A quick procedure not even taking 30 minutes, factoring in the need to refi

Treating Under My Chin With Threads

 I probably should have a better plan mapped out when treating my skin with threads, but I often decide on the day where I'm actually going to place the threads. This treatment was a little harder to choose because I wanted to treat my labionasal folds, however decided against it after realising that I would be inserting threads that would overlap with the cheek threads I had last treated with threads. I would prefer to let areas have time to heal for at least a month before creating trauma in that same area. I scrapped my plan of using 27g by 38 mm PCL threads and instead treated under my chin using  29g by 25 mm PDO screw threads . I placed them fairly close together and after losing one thread when removing the protective cap, I put in 19 threads just under the chin. After I buy more threads I do plan to treat under my jaw to reduce sagging in these areas. I did cause a small bruise under my chin, other than that this treatment did go well. Check out my  Link.Tree  for socials a

Curenex Rejuvenating Solution Round 4

 I'm at the penultimate round of Curenex Rejuvenating Solution, just one more to go. At the risk of annoying you by continuing to repeat myself, I used the BAP mapping plus some extra injection points in lips, under eyes and forehead. Apparently I had not learned my lesson with portion control, because I only had 0.5 of a ml left over for under my eyes. I went ahead and used 0.25 ml on each side near my orbital bone using the pupil of my eye as a guide. Having 5 ml of product to play with tends to make me heavy handed with the amount I inject, that and the ease of injecting a treatment with a thin consistency that doesn't cause a sting. I didn't have the amount I wanted to inject under my eyes, but I was glad that I at least had some. That's because under my eyes is a problem area for me with the creasing, dark circles and dehydration.  Next month I will have my final thoughts of Curenex Rejuvenating Solution.                                        Check out my  Link.Tr

Chemical Peel Update

Image
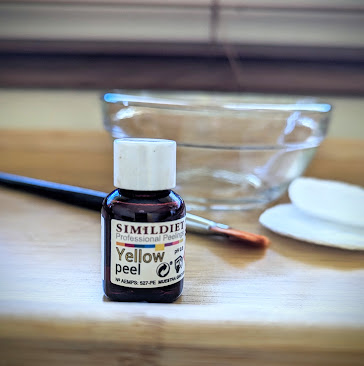
 Not wanting to sanitise my skin and risk damage, I chose not to do any invasive treatments this week. Instead, I'll just give you an update of where my skin is at a week after doing my first ever chemical peel. I used the retinol based Simildiet Yellow Peel from Promesse Filler. With a lot of peeling happening over the last few days, that annoying tightness is becoming less noticeable. My biggest problem now is the impatience to unveil my new skin with the increasing temptation to peel off the dead skin. I will admit to very gently tugging only until there's resistance, then I use a small pair of scissors to trim off the excess. I have been diligent to apply a balm during the day, then slathering on spf and trying to avoid the sun when I can. At night I've been using a layer of vitamin E oil, then glycerin just to keep my skin moisturised. Knowing that my skin continues to peel especially overnight (I assume because of my movements while asleep) I must admit to looking for

Simildiet Yellow Peel

Image
 I have done chemical exfoliating masks in the past, but until now had never done a chemical peel. It was something that I believed would be beneficial for my aging and pigmented skin, I just wasn't sure it's something I should do for myself. Of course that was until I started trying diy invasive beauty treatments. After reaching out to French vendor Promesse Filler explaining my skin concerns, they kindly sent me single use samples of some of the chemical peels available on their website. My biggest issue was working out an order to use them in! I opted to try the Yellow Peel for its targeting of pigmentation. It does this primarily with 0.1 % retinol, but also contains trichloroacetic acid, lactic acid and salicylic acid. Evening out skintone is the main goal, however in turn this peel helps with fine lines and dull skin. I used a fan brush to apply thin layers of the liquid yellow product to my face, avoiding my eyes and lips, although I did include my upper lid area in an

Using 27g X 38mm PCL Threads In My Cheeks

Image
 The last time I used threads was when I caused the bad bruising under my eyes. Not going to lie, I was hesitant to insert threads into my skin hence why I had paused my thread treatments even though I would prefer to at least do them monthly. Well, I had nothing penned in my treatment diary and decided it was time to rip that bandaid off and insert some threads. It had been some time since I had treated my cheeks, so I chose 27 gauge by 38 mm PCL threads to do the job. I began on the right side of my face starting near my ears towards my nose. And yes I started        s l o w. I was being overly cautious, not willing to force a thread where it could cause damage. I did have to abort mission on one thread because I hit a nerve. Yep, it's not pleasant and continued to cause issues the next day when it was uncomfortable opening my mouth to eat. My plan was to create the hashtag pattern, but after inserting 2, I just found the length too long. I even hit my cheek bone with one. Surpri

A Little Ramble

 As much as I love to have a plan when it comes to more invasive treatments, life happens. I'm currently recovering from the flu and figured my body was going through enough trying to get better that it didn't need to use more energy to heal from whatever torture I had planned, lol. Besides, bed seemed like a much better option for me. This time also gave me an opportunity to export most of my treatment videos on YouTube to Rumble. I had one video deleted and didn't want to chance losing my channel. I then had to replace the videos on my blog with videos uploaded from Rumble. It was an ordeal, but better than losing all of my content which I had not backed up. I'm sorry I have no content this week, but it proves that although it's helpful to have a treatment plan, it needs to be a flexible one. I've adjusted my calender and will hopefully have a procedure video for you next week. Check out my  Link.Tree  for socials and affiliates :)

Curenex Rejuvenating Solution Round 3

 Another month, another round of Curenex Rejuvenating Solution. I plan on doing 5 rounds and although I'm yet to notice significant changes I am hoping to by the end of the 5 month treatment plan. Don't get me wrong, I enjoy knowing that I am injecting beneficial ingredients into my skin and I notice the hydration and smoothness to my skin after each procedure, however as I have stated, I experience these results with non-crosslinked hyaluronic acid product Hyaron. I began the procedure by treating my lips as I wanted to be done with the area I hate doing the most. I poked my lips each side of my cupids bow and 3 times in my bottom lip, using around 0.2 ml of product in each injection site. All after icing which makes it somewhat more tolerable.  Without bothering to mark the mapping, I went ahead and used the BAP method with around 0.3 ml of product in each and modifying this mapping to include 3 forehead injections. Next I used the remaining 1 ml of Curenex under my eyes, inj

Fibroblasting Upper Lids

Image
 Fibroblasting is a treatment done using a device that creates a plasma arc to wound the skin. Why would I want to do this to myself? As the skin heals, it tightens the skin between the wounds. In office treatment would have the superior equipment, however there's plenty of DIY pens that can be purchased for in the home use. Many of these touted plasma pens are quite expensive, so of course I searched for a cheaper alternative. That being a mole remover pen.  Now, I'm not suggesting that this will give me the same results as plasma pens and I'm not promoting mole pens for this purpose. I just wanted to try it without investing in a more expensive device. I prefer to stick to a budget and will splurge only if I feel it necessary. The wounds are created by holding the needle as close as possible to the skin to create a spark with the aim of not touching the skin. I found this quite hard, especially because it was difficult to judge how close the needle was to my skin because

Attempting to Iron Out My Wrinkles with Toxta

 Not going to lie, injecting botulinum toxin myself is something that I still find intimidating. The thought of creating a problem that I'm stuck with for 3 months is not appealing. After using Toxta 4 times now I still don't feel I've discovered the mapping to match my facial structure perfectly. Watching many videos has helped, but can also be confusing when people are usimg different placement, depths and amounts, but that's because we're all individual and that is what works for them. So for now I will stick to basic mapping, yet still concentrating on the wrinkles being caused by various facial movements. Maybe next time I will video my mapping out the injection points. For this procedure I was actually using Toxta that I had previously reconstituted with sterile saline,  transferred into syringes and placed in the freezer from the last time I 'toxed my face. It was nice not to have this added step. I did plan to treat my forehead, crows feet and DAOs (mari

Second Round of Curenex Rejuvenating Solution

Image
 Having Curenex Rejuvenating Solution scheduled did not bring me the dread that Miracle L normally does. The biostimulator that is Miracle L does wonders for the skin, but I find it stings to inject. Although the Curenex PDRN product is more of a hydrating treatment than tightening, it is far easier to inject into the skin. Once again I used the BAP mapping with quite a few extra injections where I wanted extra treatment. These being the lips and under eye area. My lips get quite dry and I have those unsightly barcode lines from drinking out of a straw. As for my under eyes, apart from the hollows and very dark circles, I have found they've become quite lined and dehydrated looking. I'm not sure what this  Curenex injectable will improve in these areas, but I figured it was worth testing it out.  I used the full 5 ml vial, injecting with a 30 gauge x 4mm needle tip, making poking into my skin easy. For each point I injected approximately 0.3 of a mm, so I had plenty of product

Simildiet Argilac Mask

Image
 I wanted to take a break from poking anything into my skin, but still wanting to maintain a weekly treatment schedule so I opted to be kinder to my skin and use a mask. The Simildiet Argilac Mask is formulated for sensitive skin. Although I don't have this skin type it sounded perfect for what I wanted to use. The mask contains L-Argininine, lactic acid and niacinamide. The formulation uses percentages that are exfoliating but not harsh and do not cause peeling. I received a 3 ml trial size, enough for one use. The yellow liquid was honey like in consistency so was thicker than I was expecting but made for easy application because there was no dripping. I used the fan brush provided to apply the mask all over my face and neck, going over areas more than once  until I finished all of the product. I had no reaction to this mask, not even a tingle. I was surprised that the active ingredients were formulated in such a way to be so gentle on my skin.  The mask can be left on for up to

Dealing With Bruising

 I am now more surprised if I don't bruise when doing procedures on myself. Not so often from injectables because the mapping I use avoids bruising, but inserting threads often leads to bleeding under the skin as I am still learning my facial anatomy. Normally I let bruises heal on their own, but my under eyes are an area I really hate getting them. They take longer to disappear for me and often are darker than other areas of my face.  After my recent mishap after inserting threads in my under eye area I was on the hunt for something to reduce the terrible bruising I had caused. I began with applying magnesium oil, lavander oil and arnica cream as well as using an ice roller at various intervals of the day. This worked well for reducing the swelling, but not so much for the terrible bruising. I follow a few DIY beauty facebook groups and there are many remedies that people use for their bruising. Arnica and icing is popular, but what many swear by is flushing the bruise with steril

When DIY Doesn't Go To Plan

 In my limited experience in beauty DIY I've had issues during a procedure that I think could have gone better but I've never felt the need to stop, until now. This is something that I would prefer not to share, but I think it's beneficial to show the fails with the wins. So here goes. I planned to treat my under eyes with threads, a procedure I've done before without any real issue. Instead of PDO this time, I opted for the longer lasting PCL version, using 29 gauge by 25 mm threads. I began with inserting vertically under my right eye, which went fine. Instead of stopping there, I so wish I had, I thought that creating a hashtag pattern with some horizontal threads would create much needed volume in my under eye hollows. I had some swelling, but nothing I was too concerned about.  I switched to the other eye, starting with the horizontal pattern. Once again, I felt some resistance in one area and a small pop as the needle pushed through. Well, the swelling began immed

Curenex Rejuvenating Solution

Image
 Curenex Rejuvenating Solution is a hydrating injectable that contains the hero ingredient PDRN, what is PDRN you ask? Well polydeoxyribonucleotide, which is a mouthful but a nicer name for what is pretty much salmon sperm dna. This "interesting" ingredient actually is very close to our own DNA and does wonders to revitalise our skin. It can improve skin tone, texture and elatsticity, while is also known for it's skin healing properties. The solution also contains peptides, hyaluronic acid and glutathione, making it a very hydrating product which is crucial for aging skin. I purchased a pack of  5 vials, each containing 5 ml of product. I opted to use the BAP mapping to inject this product. Modifying it by adding 3 spots in my forehead and 2 each in top and bottom lips. My plan was to treat my under eyes but with 5 ml I was very heavy handed. Contributing was how easy this product was to inject. No pain from the product and not very thick. Next time I use this solution to

Treating the Face with Miracle Touch BR

 Miracle Touch BR is a brightening treatment that I have used twice under my eyes in an attempt to lighten my dark circles. Although there was a brightening of the area, my dark circles remained the same. My next plan was to treat my whole face with this product, it was just a matter of fitting it into my beauty DIY schedule. I made the decision to bump my monthly Hyaron treatment for this one. I was preparing myself to meso, not looking forward to injecting every centimeter or so apart on my face when it occured to me that I could use the BAP method for this hydrating injectable. Now the BAP mapping is 10 injections that do not include the forehead, I have modified it to include two points in this area. The BAP mapping as shown in my video below has been designed to effectively spread product with the least chance of causing bruising. The consistency of the golden liquid is not water thin, but no where near as thick as Miracle L, so I used a 30 gauge by 4 mm needle tip and used half o